Summary:
See also: Dynamic User Interface
A Menu defines a list of options (also called actions) that can trigger program routines. The MENU statement is an interactive instruction defining the possible actions that can be executed in a specific context at a given place in the program. One Menu can only define a set of options for a given level. You cannot define all menu options of your program in a unique Menu; you must use nested Menu calls. A typical application starts with a global Menu, defining general options to access sub-routines, which in turn implement specific Menus with options like 'Append', 'Delete', 'Modify', and 'Search' that trigger sub-routines to manage database records.
A MENU statement is a controller for user actions. You can bind actions views with the Menu options by name, for example:
Action views are bound to an action controller by name. See the Interaction Model description for more details.
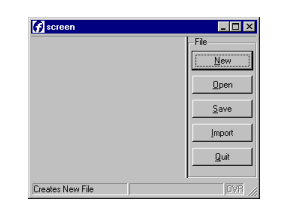
By default, if no action views are associated with Menu options, these are displayed as a simple push buttons in a specific area, depending on the front end. The following screen is produced by the program shown in Example 1:
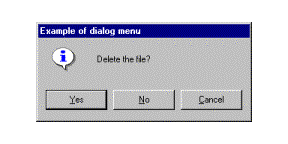
You can display a Menu in a modal dialog window by setting some attributes, as shown in the source code of Example 2:
For more details about default and explicit action views, see Interaction Model.
The MENU instruction defines a set of user choices.
MENU [title]


   [ ATTRIBUTE ( control-attributes ) ]


   [ BEFORE MENU

       menu-statement

       [...]

   ]

   menu-option

   [...]


END MENU
where menu-option is one of:
 { COMMAND
option [comment] [ HELP help-number ]

    menu-statement

    [...]

 | COMMAND KEY ( key-name )
option [comment] [ HELP help-number ]

    menu-statement

    [...]

 | COMMAND KEY ( key-name )

    menu-statement

    [...]

 | ON ACTION action-name

    menu-statement

    [...]

 | ON IDLE idle-seconds

    menu-statement

    [...]

 }
where menu-statement is:
{ statement

 |  CONTINUE MENU

 |  EXIT MENU

|  NEXT OPTION option

 | SHOW OPTION { ALL |
 option [,...] }

 |  HIDE OPTION { ALL |
 option [,...] }

 }
The following table shows the control-attributes supported by the MENU statement:
| Attribute | Description |
| STYLE = string | Defines the type of the menu. Values can be
'default', 'dialog' or 'popup'. |
| COMMENT = string | Defines the message associated with this menu. |
| IMAGE = string | Defines the icon file associated with this menu. |
When the runtime system encounters an MENU statement, it does the following::
The MENU instruction can be used to control user actions. See Interaction Model for more details about actions.
The typical usage of a MENU instruction is show in the following example, using a set of ON ACTION control blocks:
01MENU02ON ACTION new03CALL newFile()04ON ACTION open05CALL openFile()06ON ACTION quit07EXIT PROGRAM08END MENU
The COMMAND clause defines both the action name and the label of the menu option, which is by default decorated on the front end side as a push-button in a specific area. The ON ACTION clause defines an action trigger clause as described in the User Interaction section. To write abstract code, we recommend that you use the ON ACTION clause instead of COMMAND. However, when using 'dialog' menus, sometimes you only need to provide the title of the buttons, and you can use COMMAND clauses.
When the STYLE instruction attribute is set to 'default' or when you do not
specify the menu type, the runtime system
generates a default decoration as a set of buttons in a specific area of the
current window. When this attribute is set to 'dialog',
the menu options appear as buttons at the bottom in a temporary modal window, in which
you can define the message and the icon with the COMMENT and IMAGE
attributes. When the STYLE is set to 'popup', the menu
appears as a popup menu (contextual menu).
Warning: If the menu is a "dialog"
or "popup", the dialog is automatically exited after any
action clause such as ON ACTION, COMMAND or ON IDLE.
When an MENU instruction executes, the runtime system creates a set of default actions.
The following table lists the default actions created for this dialog:
| Default action | Control Block execution order |
| close | By default, generates a cancel key press (COMMAND KEY(INTERRUPT)) Default action view is hidden. See Windows closed by the user. |
| help | Shows the help topic defined by the HELP clause. Default action view is hidden. |
If the menu block contains a BEFORE MENU clause, statements within this clause will be executed before the menu is displayed.
The ON ACTION action-name clause defines a set of instructions that must be executed when an action is fired.
During a dialog, you can enable or disable an action with the setActionActive() method of the dialog. You can also hide and show the default action view with the setActionHidden() method:
01...02BEFORE MENU03CALL dialog.setActionActive("query",FALSE)04CALL dialog.setActionHidden("adduser",TRUE)05...
The ON IDLE idle-seconds clause defines a set of instructions that must be executed after idle-seconds of inactivity. This can be used, for example, to quit the dialog after the user has not interacted with the program for a specified period of time. The parameter idle-seconds must be an integer expression. If it evaluates to zero, the timeout is disabled.
01...02ON IDLE 1003IF ask_question("Do you want to leave the dialog?") THEN04EXIT MENU05END IF06...
When using the traditional COMMAND clause, it automatically defines the text and comment decoration attributes for the default action view. Since these attributes are defined by the program, the corresponding text and comment attributes in action defaults are not applied to these menu options. For example, when you define a COMMAND "Hello" menu option, the button text will be "Hello", even if an action default defines a text "Bye!" for the action "hello".
When using COMMAND KEY, it automatically defines the acceleratorName attribute for the action and the corresponding action default accelerator will be ignored. For example, when you define a COMMAND KEY(F10) "Hello" menu option, the first accelerator will be "F10", even if an action default defines an accelerator "F5" for the action "hello". However, you can set the second accelerator with the acceleratorName2 attribute in action defaults.
CONTINUE MENU statement causes the runtime system to ignore the remaining instructions in the current block and redisplays the menu.
EXIT MENU statement terminates the MENU block without executing any other statement.
The NEXT OPTION option statement defines option as the default. This cannot apply to a hidden option, and works only with default action views created when an explicit view is not used.
The SHOW OPTION and HIDE OPTION statements are provided for backward compatibility only. The SHOW OPTION statement is used to make the default action view visible and the explicit action views enabled. The HIDE OPTION statement is used to make the default action view invisible and the explicit action views disabled. The ALL clause can be used to specify all options.
01MENU "File"02COMMAND KEY ( CONTROL-N ) "New" "Creates New File" HELP 10103CALL newFile()04COMMAND KEY ( CONTROL-O ) "Open" "Open existing File" HELP 10205CALL openFile()06COMMAND KEY ( CONTROL-S ) "Save" "Save Current File" HELP 10307CALL saveFile()08COMMAND "Import"09LOAD FROM "infile.dat" INSERT INTO table10COMMAND KEY ( CONTROL-Q ) "Quit" "Quit Program" HELP 20111EXIT PROGRAM12END MENU
01MAIN02MENU "Example of dialog menu"03ATTRIBUTE ( STYLE="dialog", COMMENT="Delete the file?" )04COMMAND "Yes"05DISPLAY "Yes"06COMMAND "No"07DISPLAY "No"08COMMAND "Cancel"09DISPLAY "Cancel"10END MENU11END MAIN
01MENU02ON ACTION new03CALL newFile()04ON ACTION open05CALL openFile()06ON ACTION save07CALL saveFile()08ON ACTION import09LOAD FROM "infile.dat" INSERT INTO table10ON ACTION quit11EXIT PROGRAM12END MENU