Summary:
See also: Form Files, Windows and Forms.
By default, a Genero BDL application executes in graphical mode. However, you can run the applications in dumb terminals. This text-based / non-graphical display is called console mode. To run the application in console mode, set the FGLGUI environment variable to zero.
In graphical mode, when the first interactive instruction like MENU or INPUT is executed, the runtime system establishes a tcp connection to the front-end. The front-end acts as a graphical server for the runtime system.
On the runtime system side, the front-end is identified by the FGLSERVER environment variable. This variable defines the hostname of the machine where the front-end resides, and the number of the front-end instance to be used.
The syntax for FGLSERVER is hostname[:servernum]:
$ FGLSERVER=fox:1
$ fglrun myprog
The servernum parameter is a whole number that defines the instance of the front-end. It is actually defining a tcp port number, starting from 6400. For example, if servernum equals 2, the tcp port number used is 6402 (6400+2).
This is the standard/basic connection technique, but you can set up different types of configurations; for example, to have the front-end connect to an application server via ssh, to pass through firewalls over the internet. Refer to the front-end documentation for more details.
The front-end can open a terminal session on the application server to start a program from the user workstation. This is done by using a ssh, rlogin, or telnet terminal session. When the terminal session is open, the front-end sends a couple of shell commands to set environment variables like FGLSERVER before starting the Genero program to display the application on the front-end where the terminal session was initiated.
In this configuration, front-end identification takes place. The front-end identification prevents the display of application windows on a front-end that did not start the Genero application on the server. If the front-end was not identified, it would result in an important security problem, as anyone could run a fake application that could display on any front-end and ask for a password.
When the runtime system waits for a user action, but the end user does not do anything, the client sends a 'ping' event every 5 minutes to keep the tcp connection alive. This situation can happen if the user leaves the workstation for a while without closing the application.
If the client is not stopped properly (when killed by a system reboot, for example), the tcp connection is lost and the runtime system does not receive any more 'ping' events from the client. In this case, the runtime system waits for a specified time before it stops with fatal error -8062.
By default, the runtime system waits for 600 seconds (10 minutes).
You can configure this timeout with an FGLPROFILE entry:
gui.protocol.pingTimeout = 800
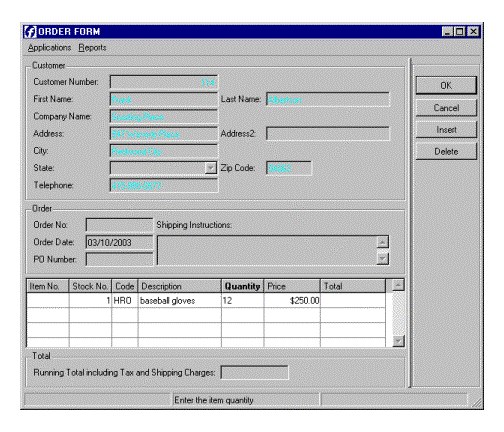
In Genero, the user interface is designed to provide a real graphical look and feel, compared to traditional Informix 4GL applications. However, graphical user interfaces and especially windows management is not compatible with the traditional 4GL user interface management, which was designed for character terminals. With the graphical interface of Genero, you can, for example, display windows as real movable and resizable windows, display labels with variable fonts, use toolbars and pull-down menus, or show error messages in a status bar. But this requires you to adapt the code and remove instructions like DISPLAY AT, that make no sense in real graphical mode.
The Dynamic User Interface (DUI) is a global concept for a new, open User Interface programming toolkit and deployment components, based on the usage of XML standards and built-in classes.
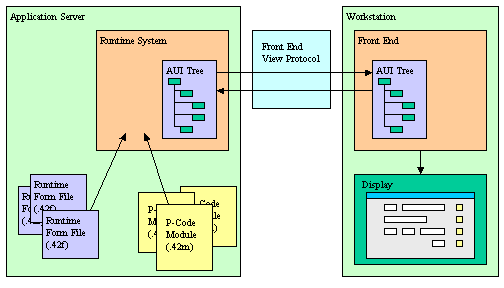
The purpose of the DUI is to support different kinds of display devices by using the same source code, introducing an abstract definition of the user interface that can be manipulated at runtime as a tree of user interface objects. This tree is called the Abstract User Interface.
The Runtime System is in charge of the Abstract User Interface tree and the Front End is in charge of making this abstract tree visible on the screen. The Front End gets a copy of that tree which is automatically synchronized by the runtime by using the Front End Protocol.
In development, application screens are defined by Form Specification Files. These files are used by the Form Compiler to produce the Runtime Form Files that can be deployed in production environments.
The following schema describes the Dynamic User Interface concept, showing how the Abstract User Interface tree is shared by the Runtime System and the Front End:
The Abstract User Interface tree on the front-end is synchronized with the runtime system AUI tree when a user interaction instruction takes the control. This means that the user will not see any display as long as the program is doing batch processing, until an interactive statement is reached.
For example, the following program shows nothing:
01MAIN02DEFINE cnt INTEGER03OPEN WINDOW w WITH FORM "myform"04FOR cnt=1 TO 1005DISPLAY BY NAME cnt06SLEEP 107END FOR08END MAIN
If you want to show something on the screen while the program is running in a
batch procedure, you must force synchronization with the front-end, by calling the
refresh() method of the Interface
built-in class:
01MAIN02DEFINE cnt INTEGER03OPEN WINDOW w WITH FORM "myform"04FOR cnt=1 TO 1005DISPLAY BY NAME cnt06CALL ui.Interface.refresh() -- Sync the front-end!07SLEEP 108END FOR09END MAIN
The Abstract User Interface defines a tree of objects organized by parent/child relationship. The different kinds of user interface objects are defined by attributes. The AUI tree can be serialized as text according to the XML standard notation.
The following example shows a part of an AUI tree defining a Toolbar serialized with the XML notation:
<ToolBar>
  <ToolBarItem name="f5" text="List" image="list" />
  <ToolBarSeparator/>
  <ToolBarItem name="Query" text="Query" image="search" />
  <ToolBarItem name="Add" text="Append" image="add" />
  ...
</ToolBar>
The objects of the Abstract User Interface tree can be queried and modified at runtime with built-in classes like ui.Form, provided to manipulate form elements.
01DEFINE w ui.Window02DEFINE f ui.Form03LET w = ui.Window.getCurrent()04LET f = w.getForm()05CALL f.setElementHidden("groupbox1",1)
In very special cases, you can also directly access the nodes of the AUI tree by using DOM API classes like DomDocument and DomNode. To get the user interface nodes at runtime, the language provides different kinds of API functions or methods, according to the context. For example, to get the root of the Abstract User Interface tree, call the ui.Interface.getRootNode() method. You can also get the current form node with ui.Form.getNode() or search for an element by name with the ui.Form.findNode() method.
The Abstract User Interface identifies all possible actions that can be received by the current interactive instruction with a list of Action nodes. The list of possible actions are held by a Dialog node. An Action node is identified by the 'name' attribute and defines common properties such as the accelerator key, default image, and default text.
Interactive elements are bound to Action nodes by the 'name' attribute. For example, a Toolbar item (button) with the name 'cancel' is bound to the Action node having the name 'cancel', which in turn defines the accelerator key, the default text, and default image for the button.
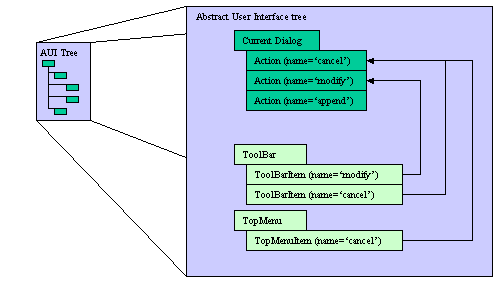
When an interactive element is used (such as a form field input, toolbar button click, or menu option selection), an ActionEvent node is sent to the runtime system. The name of the ActionEvent node identifies what Action occurred and the 'idRef' attribute indicates the source element of the action.
See also Front End Events for more details.
The Front End Protocol (FEP) is an internal protocol used by the Runtime System to synchronize the Abstract User Interface representation on the Front End side. This protocol defines a simple set of operations to edit the Abstract User Interface tree. This protocol is based on a command processing principle (send command, receive answer) and can be serialized to be transported over any network protocol, like HTTP for example.
Both the Abstract User Interface and the Front End Protocol are public to allow third parties to develop their own Front Ends. This enables applications to be deployed on very specific Workstations.
Refer to Front End Protocol for more details about the operations supported by this communication protocol.
The Dynamic User Interface architecture is based on the MVC (Model/View/Controller) concept. The Model defines the object to be displayed (this is typically the application data that is stored in program variables). The View defines the decoration of the Model (how the Model must be displayed to the screen, this is typically the form). The Controller is the program code that implements the processing that manages the Model. Multiple Views can be associated to a Model and a Controller.
With BDL, you define the Views in the Abstract User Interface tree or through built-in classes designed for this (such as Window or ComboBox). You store Models in the program variables, and you implement the Controllers with interactive instructions such as MENU, INPUT, INPUT ARRAY, CONSTRUCT and DISPLAY ARRAY.
Normally the Controllers should not provide any decoration information (that is the purpose of Views), but because of the history of the language, some interactive instructions such as MENU define both the Controller and some presentation information (menu title, command labels and comments). In such a case, the runtime system automatically creates a View with that information, but you can associate other Views like a Toolbar, for example.
In the user interface of the application, you can have interactive elements (like buttons) that can trigger an event that must be transmitted to the Runtime System for interpretation. To manage such events, the Views can produce Actions that can be received by the current active Controller in the program.
Actions Views (like buttons) are bound to an action by the 'name' attribute. For example, a Toolbar item (button) with the name 'cancel' is bound to the Action having the name 'cancel'.
During an interactive instruction such as MENU, INPUT, INPUT ARRAY, CONSTRUCT and DISPLAY ARRAY, a program can execute a set of instructions for a given Action by using ON ACTION clause:
01INPUT ARRAY custarr WITHOUT DEFAULTS FROM sr_cust.*02ON ACTION printrec03CALL PrintRecord(custarr[arr_curr()].*)04ON ACTION showhelp05CALL ShowHelp()06END INPUT
The name of the action can be any valid identifier. Watch out for case sensitivity; in the Abstract User Interface tree (where you define the views), action names are case sensitive (because these are standard DOM attribute values). However, in BDL identifiers are not case sensitive. To avoid any confusion, the compiler automatically converts action identifiers to lowercase.
For backward compatibility, the ON KEY clauses are still supported, but it is strongly recommended that you use ON ACTION clauses instead, because these identify user actions with an abstract name.
A default decoration for action views can be centralized in an external file. This is strongly recommended, to separate decoration from action usage as much as possible. See Action Defaults for more details.
During a dialog, you can enable or disable an action with the setActionActive()
method of the ui.Dialog built-in class. This
method takes the name of the action (lowercase letters!) an integer expression as argument.
01...02BEFORE INPUT03CALL DIALOG.setActionActive("zoom",FALSE)04...
If no explicit action view is defined, such as a toolbar button or a topmenu command, the front-end creates a default action view for each MENU COMMAND, ON KEY or ON ACTION clause used in the current interactive instruction (typically, the default action views appear as buttons in the action frame). You can control the presentation of these default views with the Window Styles.
If one or more action views are defined explicitly for a given action, the front-end considers that the default view is no longer needed, and hides the corresponding button. Typically, if you define in the form a BUTTONEDIT field or a BUTTON that triggers an action, you do not need an additional button in the action frame.
The language pre-defines some actions for common dialog operations.
If you define your own ON ACTION handler with a predefined action name, the default action processing is bypassed and the program code is executed instead.
If you define action views using predefined action names, they will automatically attach themselves to the common actions of the interactive instructions. It is also possible to define default images, texts, comments and accelerator keys in the Action Defaults resource file for these predefined actions.
The following table shows the predefined names for common actions. The first part show actions that are controlled by the runtime system, the second part shows actions that are handled on the client side (local client actions).
| Action Name | Description | Context |
| Runtime Controlled Actions | ||
| accept | Validates the current dialog instruction | (1) |
| cancel | Cancels the current dialog instruction | (1) |
| close | By default, triggers an cancel key in the current dialog instruction | (7) |
| insert | Inserts a new row before current row | (2) |
| append | Appends a new row at the end of the list | (2) |
| delete | Deletes the current row | (2) |
| nextrow | Moves to the next row in a list displayed in one row of fields. | (5) |
| prevrow | Moves to the previous row in a list displayed in one row of fields. | (5) |
| help | Shows the help topic defined by the HELP clause | (1) |
| Client Controlled Actions | ||
| interrupt | Sends an interruption request to the program | (6) |
| editcut | Copies to the clipboard and removes the current selected text | (1) |
| editcopy | Copies to the clipboard the current selected text | (1) |
| editpaste | Pastes the clipboard content to the current input widget | (1) |
| nextfield | Moves to the next field in the form | (3) |
| prevfield | Moves to the previous field in the form | (3) |
| nextrow | Moves to the next row in the list | (4) |
| prevrow | Moves to the previous row in the list | (4) |
| firstrow | Moves to the first row in the list | (4) |
| lastrow | Moves to the last row in the list | (4) |
| nextpage | Moves to the next page in the list | (4) |
| prevpage | Moves to the previous page in the list | (4) |
The ON ACTION clause can be used in a dialog instruction with a predefined action name:
01INPUT BY NAME customer.*02ON ACTION accept03...04END INPUT
In this case, the default behavior is not performed; the user code is executed instead.
Some parts of the user interface can define accelerators keys, such as Action Defaults.
The following table lists all the keyboard accelerator names recognized by the runtime system:
| Accelerator Name | Description |
| 0-9 | Decimal digits from 0 to 9 |
| A-Z | Letters from A to Z |
| F1-F35 | The functions keys |
| Return | The RETURN key (alphanumeric keypad, see Note 1) |
| Enter | The ENTER key (numeric keypad, see Note 1) |
| Space | The SPACE-BAR key |
| Escape | The ESCAPE key |
| Tab | The TABULATION Key |
| BackSpace | The BACKSPACE key (do not confuse with DELETE key) |
| Up | The UP key (arrow keyboard group) |
| Down | The DOWN key (arrow keyboard group) |
| Left | The LEFT key (arrow keyboard group) |
| Right | The RIGHT key (arrow keyboard group) |
| Insert | The INSERT key (navigation keyboard group) |
| Delete | The DELETE key (navigation keyboard group) |
| Home | The HOME key (navigation keyboard group) |
| End | The END key (navigation keyboard group) |
| Next | The NEXT PAGE key (navigation keyboard group) |
| Prior | The PRIOR PAGE key (navigation keyboard group) |
The "Enter" key represents the ENTER key available on
the numeric keypad of standard keyboards, while "Return"
represents the RETURN key of the
alphanumeric keyboard. By default, the validation action is configured to accept
both "Enter" and "Return" keys.
See the default Action Defaults file in
$FGLDIR/lib/default.4ad.
All of the key names listed in the previous table can be combined with CONTROL /
SHIFT / ALT modifiers, by adding respectively "Control-",
"Shift-", or "Alt-" to the name of the accelerator.
For example:
Control-P
Shift-Alt-F12
Control-Shift-Alt-ZWhen the BDL program executes an interactive instruction, the client can send action events based on user actions. However, when the program performs a long process like a loop, a report, or a database query, the client has no control. In some cases, you might want to permit the user stop a long running process.
To detect user interruptions, define an action view with the name 'interrupt'. When the runtime system takes control to process program code, the client automatically enables the local 'interrupt' action to let the user send an asynchronous interruption request to the program.
Form file "f1.per":
01LAYOUT02GRID03{04Step: [pb ]05[sb ]06}07END08END09ATTRIBUTES10PROGRESSBAR pb = FORMONLY.progress, VALUEMIN=0, VALUEMAX=100;11BUTTON sb : interrupt, TEXT="Stop";12END
Program:
01MAIN02DEFINE i,j INTEGER03DEFER INTERRUPT04OPEN FORM f1 FROM "f1"05DISPLAY FORM f106LET int_flag=FALSE07FOR i=1 TO 10008DISPLAY i TO progress09CALL ui.Interface.refresh()10FOR j=1 TO 1000 -- Loop to emulate processing11DISPLAY j12IF int_flag THEN EXIT FOR END IF13END FOR14IF int_flag THEN EXIT FOR END IF15END FOR16END MAIN
By default, program windows are displayed independently in separate system windows (this mode is well known as SDI, Single Document Interface). The user interface can be configured to group program windows in a parent container (also known as MDI, Multiple Document Interface). In BDL, multiple document interface is named WCI: Window Container Interface.
A Window Container Interface (WCI) can be used to group several programs together in a parent window. The parent program is the container for the other programs, defined as children of the container. The container program can have its own windows, but this makes only sense for temporary modal windows (style="dialog").
WCI configuration is done dynamically at the beginning of programs, by using the ui.Interface built-in class.
The WCI container program is a separate BDL program of a special type, dedicated to contain other program windows. On the front-end, container programs automatically display a parent window that will hold all child program windows that will attach to the container.
The WCI container program must indicate that its type is special (setType method), and must identify itself (setName method):
01MAIN02CALL ui.Interface.setName("parent1")03CALL ui.Interface.setType("container")04CALL ui.Interface.setText("SoftStore Manager")05CALL ui.Interface.loadStartMenu("mystartmenu")06MENU "Main"07COMMAND "Help" CALL help()08COMMAND "About" CALL aboutbox()09COMMAND "Exit" EXIT MENU10END MENU11END MAIN
WCI children programs must attach to a parent container by giving the name of the container program:
01MAIN02CALL ui.Interface.setName("custapp")03CALL ui.Interface.setType("child")04CALL ui.Interface.setText("Customers")05CALL ui.Interface.setContainer("parent1")06...07END MAIN
Multiple container programs can be used to group programs by application modules.
When the program is identified as a container (type="container"),
a global window is automatically displayed as an container window. The global toolbar
is displayed, a Topmenu can be created and a Startmenu can be used. Other windows created by this
kind of program can be displayed, inside the container
(windowType="normal") or as dialog windows
(windowType="modal").
Window styles can be applied to the
parent window by using the default style specification
(name="Window.main").
If a child program is started, but the parent container is not, the client shows a system error message and the program stops with a runtime error.
If a container program is started twice, the client shows a system error message and the program is stopped with a runtime error.
When the parent container program is stopped, other application are automatically stopped.
The WCI container program can query for children existence with the getChildCount
and getChildInstances methods:
01MAIN02CALL ui.Interface.setName("parent1")03CALL ui.Interface.setType("container")04CALL ui.Interface.setText("SoftStore Manager")05CALL ui.Interface.loadStartMenu("mystartmenu")06MENU "Main"07COMMAND "Help" CALL help()08COMMAND "About" CALL aboutbox()09COMMAND "Exit"10IF ui.Interface.getChildCount()>0 THEN11ERROR "You must first exit the child programs."12ELSE13EXIT MENU14END IF15END MENU16END MAIN
See the Interface built-in class for more details.
By default, the runtime system expects that the operating system running the programs uses the same character set as the operating system running the front-end. If the character sets are different, you can set an FGLPROFILE configuration parameter to enable character set mapping between the client and the runtime system, when using a single-byte character set runtime system.
The following FGLPROFILE entry defines the character table conversion file:
gui.chartable = "relative-file-path"
This file is searched in the $FGLDIR/etc directory. The runtime system automatically adds the ".ct" file extension.
Default value : NULL (no conversion).
gui.chartable = "iso/ansinogr"
The runtime system loads the character table from: $FGLDIR/etc/iso/ansinogr.ct